Template Matching
Template matching finds an object by sliding its picture across the image like a stencil and keeping the spot where the pixels line up best.
Why Does This Exist?
Sometimes the thing you want to find looks almost exactly like the picture you already have: a logo on a scanned form, a button in a screenshot test, one frame's patch in the next frame. Training a classifier for that is overkill. You have the pixels; just look for those pixels.
Template matching is that direct search, and it is the baseline every fancier detector in classical object detection had to beat. It also teaches the core pain of the whole family: sliding a window everywhere is simple, correct, and brutally expensive the moment the object rotates, scales, or the light changes.
Think of It Like This
A stencil over newsprint
Cut a word out of a newspaper, then slide the cut-out hole over every column of another page, checking at each stop how well the letters underneath align with the hole. Where the text matches, words show through cleanly. Everywhere else you get fragments.
The cut-out is the template, the sliding is the search, and "shows through cleanly" is the correlation score. And the failure is built in: shrink the newspaper on a copier and your stencil never fits again, because the hole is a fixed size.
How It Actually Works
1. Score every position
Place the template over the image at position and compute a similarity between the template pixels and the covered image patch . The workhorse score is normalized cross-correlation:
Each symbol is plain: and are the mean brightness of template and patch, so subtracting them makes the score ignore uniform lighting shifts. The result runs from (inverted) to (perfect match). The output is a whole score map, and the best match is its peak.
2. Worked example
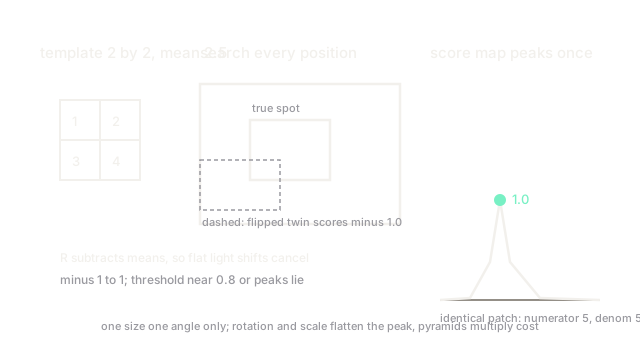
Take a template . Against an identical patch, both means are , the numerator is , both denominators are , and . Against the flipped patch every deviation changes sign, so . Same edges, opposite polarity, and the score says so exactly.
3. Pick the peak, then distrust it
The naive rule takes the argmax of the score map. In practice you set a threshold (say ) and treat everything below as "not found", because a peak among garbage is still garbage. Rotation, scale change, and occlusion all flatten the true peak, which is why production use pairs matching with pyramids and multiple rotated templates, each multiplying the cost.
Code
import numpy as np
def ncc(template: np.ndarray, patch: np.ndarray) -> float: t = template - template.mean() p = patch - patch.mean() return float((t * p).sum() / np.sqrt((t**2).sum() * (p**2).sum()))
t = np.array([[1, 2], [3, 4]], dtype=float)print(ncc(t, t)) # -> 1.0print(ncc(t, np.array([[4, 3], [2, 1]]))) # -> -1.0Watch Out For
Bright patches win for free
Without normalization, raw correlation and sum-of-squared-differences both favor bright image regions regardless of content. A white wall outscores a dim true match. Always use the normalized score above, and be suspicious of any tutorial version that skips the mean subtraction.
One template, one size, one angle
A template matches itself at its own scale and rotation and little else. If your target varies, you need a pyramid of scales and rotated copies, and the cost multiplies with each. When the template count starts looking like a training set, switch to a feature method like Haar cascades.
The Quick Version
- Template matching correlates a patch against every image position and takes the score peak.
- Normalized cross-correlation runs from to and ignores uniform brightness shifts.
- The identical patch scores 1.0; its flipped twin scores .
- Rotation, scale, and occlusion flatten the peak, so real use needs pyramids and template banks.
- Cheap, exact, and brittle: the baseline classical detectors had to beat.