Image Cropping
Cropping slices a rectangular window from an image with row and column ranges, keeping full resolution inside the window for detection and data prep.
Why Does This Exist?
Models want fixed-size inputs but photos arrive in every shape, and detectors only care about part of a frame. Cropping cuts a rectangular window out of an image so the interesting region fills the input. Unlike resizing, it never blurs or invents pixels: everything inside the window keeps its exact values. That makes it the first step in most augmentation pipelines and in any crop-then-classify design.
This page covers coordinate conventions, the standard crop types, and how boxes and keypoints must follow the crop. Get the bookkeeping wrong and labels silently point at the wrong pixels.
Think of It Like This
A paper frame over a photograph
Lay a card frame with a rectangular hole over a print. What shows through the hole is the crop: same print, smaller view, nothing redrawn. Slide the frame to choose a region, or cut along the frame to keep it.
The analogy stops at labels. A paper frame never moves the objects drawn on the print, but in vision every annotation (box corners, keypoints, masks) lives in image coordinates, so sliding the frame means subtracting its top-left corner from every label.
How It Actually Works
Slicing rows and columns
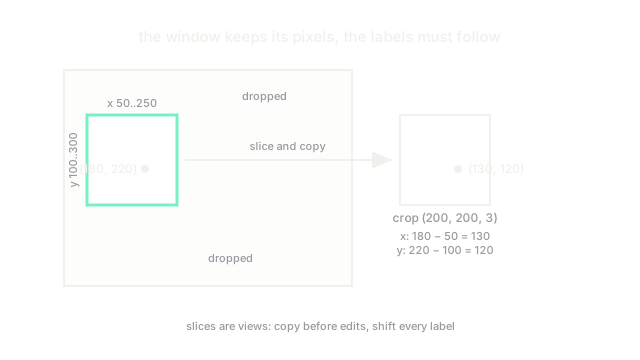
In NumPy and OpenCV, crop = img[y1:y2, x1:x2] takes rows to and columns to . Rows are the vertical axis, so the range comes first. A window from to and to out of a 480 by 640 image yields shape : height , width . The slice is a view, not a copy, so writing into it edits the original unless you call .copy().
Standard crop types
- Center crop takes the middle window, the default for validation, where you want determinism.
- Random crop samples a window position per epoch, multiplying effective data for training.
- Five-crop (four corners plus center) feeds test-time augmentation, averaging five predictions.
- Detection crop tiles a large image into overlapping windows when objects are small relative to the frame.
Labels must move with the window
A box corner at in the full image becomes in the crop, and boxes falling fully outside are dropped while straddling ones are clipped to the window edge. Forgetting this shift is the classic silent bug: training proceeds on correctly cropped images with stale boxes, and the model learns to localize a fixed offset away from the truth.
Code
import numpy as np
img = np.zeros((480, 640, 3), dtype=np.uint8)crop = img[100:300, 50:250].copy()print(crop.shape)# -> (200, 200, 3)
# Move a box corner with the window: (x1=50, y1=100)x, y = 180, 220print(x - 50, y - 100)# -> 130 120Watch Out For
Stale labels after cropping
Cropping the pixels but not the annotations leaves boxes pointing at the old coordinate frame. The symptom is a model that converges yet localizes everything with a constant shift. Always subtract the window origin from every box and keypoint in the same function that slices the pixels.
x-y order swap in slices
Arrays index [row, col], which is [y, x], but humans say "(x, y)". Writing img[x1:x2, y1:y2] crops the transposed window with no error. The symptom is a wrong-aspect crop from a non-square image. Keep the order img[y1:y2, x1:x2] and assert the output shape.
The Quick Version
- Cropping slices
img[y1:y2, x1:x2], keeping original pixels untouched at full resolution. - Center crops suit validation; random crops and five-crops suit training and test-time augmentation.
- Box corners shift by the window origin: .
- Slices are views, so call
.copy()before in-place edits. - Never crop without updating every annotation in the same step.