Padding and Stride
Padding adds a border so the filter can center on edge pixels. Stride sets how far it jumps. Together they decide the output size.
Why Does This Exist?
A filter cannot center on a border pixel without hanging off the image. Without help, every convolution shrinks the map and starves edges, and after several layers the border signal is gone. Meanwhile every layer needs a cheap way to shrink maps on purpose, or compute explodes.
Padding and stride are those two controls. Padding adds a zeros border so edges get full windows. Stride sets the step between windows, trading resolution for compute. They sit beneath convolutional layers and beside pooling, and the full arithmetic reference is CNN operations.
You need one idea first. Output size is counting placements, not learning. The formula tells you where a kernel can legally sit.
Think of It Like This
Tiles, grout and footsteps
Laying tiles on a wide floor with steps of covers positions starting at 0 and 2 only, so two tiles span it. Grout around the edge lets the first tile center on the wall line. Wider footsteps mean fewer tiles and a coarser floor.
Padding is the grout, stride is the footstep, and the output count is how many tiles fit. Where the analogy stops: grout is neutral zeros, and the network learns no weights for it.
How It Actually Works
The placement formula
For input size , kernel , padding and stride :
Same formula holds for width. with preserves size, called same padding. is valid padding and shrinks. Larger downsamples.
A worked 5 by 5
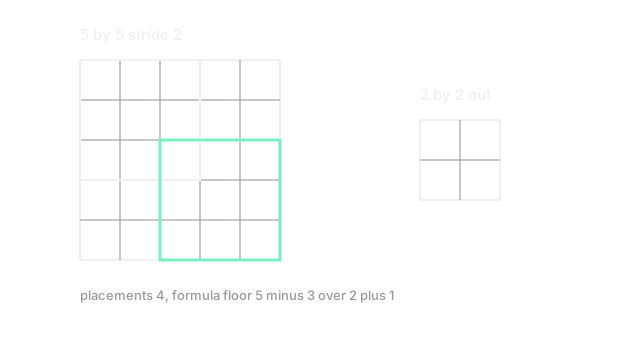
Input , kernel , , :
The kernel visits top left covering rows to , then jumps to cover rows to . Same across columns, so placements. With , the same input gives , preserving .
Choosing values
Use odd kernels with same padding to preserve size through feature blocks. Use stride convolution instead of pooling when you want learned downsampling. Keep padding symmetric, or imported weights misalign by a pixel.
Code
def conv_out(size: int, kernel: int, pad: int, stride: int) -> int: """Output size from the placement formula. All args are ints.""" return (size - kernel + 2 * pad) // stride + 1
print(conv_out(5, 3, 0, 2)) # -> 2print(conv_out(32, 3, 1, 1)) # -> 32print(conv_out(32, 3, 1, 2)) # -> 16Watch Out For
Even kernels breaking symmetry
Even sizes have no center pixel, so same padding needs uneven left and right borders. Frameworks split them differently, and a PyTorch to ONNX move shifts receptive fields by one. Prefer odd kernels and verify round trips on a probe.
Valid padding eating small objects
Repeated valid convolutions shave two pixels per layer, so border digits vanish after a few blocks. The symptom is edge accuracy far below center accuracy. Use same padding through the backbone and downsample explicitly with stride.
The Quick Version
- Padding borders the input so edge pixels get full kernel windows.
- Stride sets the jump between windows and downsamples the output.
- A 5 by 5 input with a 3 by 3 kernel at stride 2 gives a 2 by 2 output.
- Prefer odd kernels with same padding, and downsample with stride on purpose.